
Guardrails
Guardrails are automated checks for the rules your team has agreed on. Commit messages should follow a format, base images should be pinned, credentials should never be committed, and test coverage should stay above a set level. You choose the guardrails you want in buildnote.json, and the buildnote guardrails command takes care of the rest: it fetches each guardrail, runs it on your CI runner, records the result, comments on the pull request and decides whether the build should fail.
Buildnote comes with a library of ready-made guardrails. If your team has a rule the library doesn't cover, you can write your own. Every run is recorded as an event, so instead of a pass or fail you read once in a log, you get a history you can track across builds.
The guardrails reference lists every guardrail in the library along with the options it accepts.
Choosing guardrails
Start by browsing the library. You can filter it by name, category or severity. Each guardrail has its own page describing what it checks, which inputs it accepts, and an example configuration you can copy.
Guardrails are grouped into categories named after the tool or platform they check. The git category looks at your commit history, github looks at your workflows, docker at your Dockerfiles and terraform at your Terraform roots. Each programming language also has its own category with checks specific to that ecosystem. Pick the categories that match how your repository is built, then choose individual guardrails within them.
We recommend starting small. A guardrail is only useful if someone acts on what it reports, so three checks your team will fix are worth more than thirty that everyone learns to ignore. Once the first few are passing, add more.
Configuring guardrails
Guardrails are configured in the guardrails block of the buildnote.json file at the root of your repository:
{
  "guardrails": {
    "failOn": "error",
    "checks": [
      {
        "use": "git/conventional-commits@v1",
        "with": {
          "baseRef": "origin/main"
        }
      },
      {
        "use": "docker/base-pinned@v1"
      },
      {
        "use": "github/actions-pinned-by-digest@v1",
        "severity": "warning"
      },
      {
        "use": "secrets/no-hardcoded-credentials@v1"
      }
    ]
  }
}Every guardrail listed under checks runs. The use field names a guardrail from the library, including its version. Each entry can also take the following options:
severityoverrides the severity set in the guardrail's definition. Setting it towarningis a good way to introduce a new guardrail, because it reports problems without failing the build.withprovides the guardrail's inputs. Each guardrail's reference page lists its inputs and their defaults.exemptionsis a list of regular expressions matched against each violation's evidence line. Matching violations are ignored before the result is decided, which lets you exclude a specific file that is allowed to break the rule.
failOn controls which failures fail the build. With error (the default), only failing guardrails of error severity fail the build. With warning, failing warning guardrails fail it too. With never, results are reported but the build never fails. See Configuring guardrails for the full list of options.
Running guardrails locally
Before adding guardrails to CI, try them out in your local checkout:
buildnote guardrails --dry-runA dry run prints the result of every guardrail without recording events, posting comments or failing. It's the quickest way to see how your configuration behaves against your repository.
To run a single guardrail, pass its name with --only:
buildnote guardrails --only docker/base-pinned --dry-runDon't be surprised if some guardrails report skipped on the first run. When a guardrail can't find the information it needs, it skips instead of guessing, and a skipped guardrail never fails the build. For example, a coverage guardrail skips when there is no coverage report to read, and a git guardrail skips when its base ref can't be resolved.
Running guardrails in CI
Add the command to the job that already builds your project. Here's an example for GitHub Actions:
name: PR
on: pull_request

jobs:
  build:
    name: Build
    runs-on: ubuntu-latest
    permissions:
      contents: read
      checks: write
      pull-requests: write
    env:
      BUILDNOTE_GITHUB_JOB_NAME: Build
      BUILDNOTE_API_KEY: ${{ secrets.BUILDNOTE_API_KEY }}
    steps:
      - uses: actions/checkout@v4
        with:
          fetch-depth: 0

      - name: Install CLI
        uses: buildnote/action@0.2.10
        with:
          installOnly: 'true'

      - name: Guardrails
run: buildnote guardrailsTwo parts of this workflow are important.
fetch-depth: 0 fetches the full git history. The default checkout is shallow, so origin/main isn't available on the runner and every guardrail that compares your branch with a base ref would skip. Without it, the git category can't work.
The permissions block grants checks: write and pull-requests: write, which the command needs to post its results on the pull request and in the job summary. Without these permissions, guardrails can still fail the build, but the results won't appear on GitHub.
On supported CI platforms, the command detects the organisation, project, module, build, commit and ref automatically, so no arguments are needed. If you run it somewhere it can't detect these, pass --org, --project, --module and --build yourself.
Viewing results in Buildnote
Each run records two kinds of events on the build, shown on the build page alongside everything else the build collected. To see only guardrail events, filter the events table by the Guardrails and Guardrail categories.

The run event represents the whole invocation. It shows the total number of violations and the highest severity that failed. Beneath it, each guardrail has its own check event with its individual result.
A failing guardrail's status reflects its severity. A failing error guardrail shows as failed, a warning guardrail shows the warning status, and an info guardrail shows the info status. The run takes the status of the most severe failure. This makes runs easy to scan: red means an error guardrail failed, amber means a warning guardrail failed, and your failOn setting determines which of those failed the build.
Guardrails that pass or skip don't carry their severity. A warning guardrail that finds no problems simply shows as successful.
Checking a single guardrail
Click a check event to open its details. You'll see the guardrail's result, how many violations it found and the evidence for them.
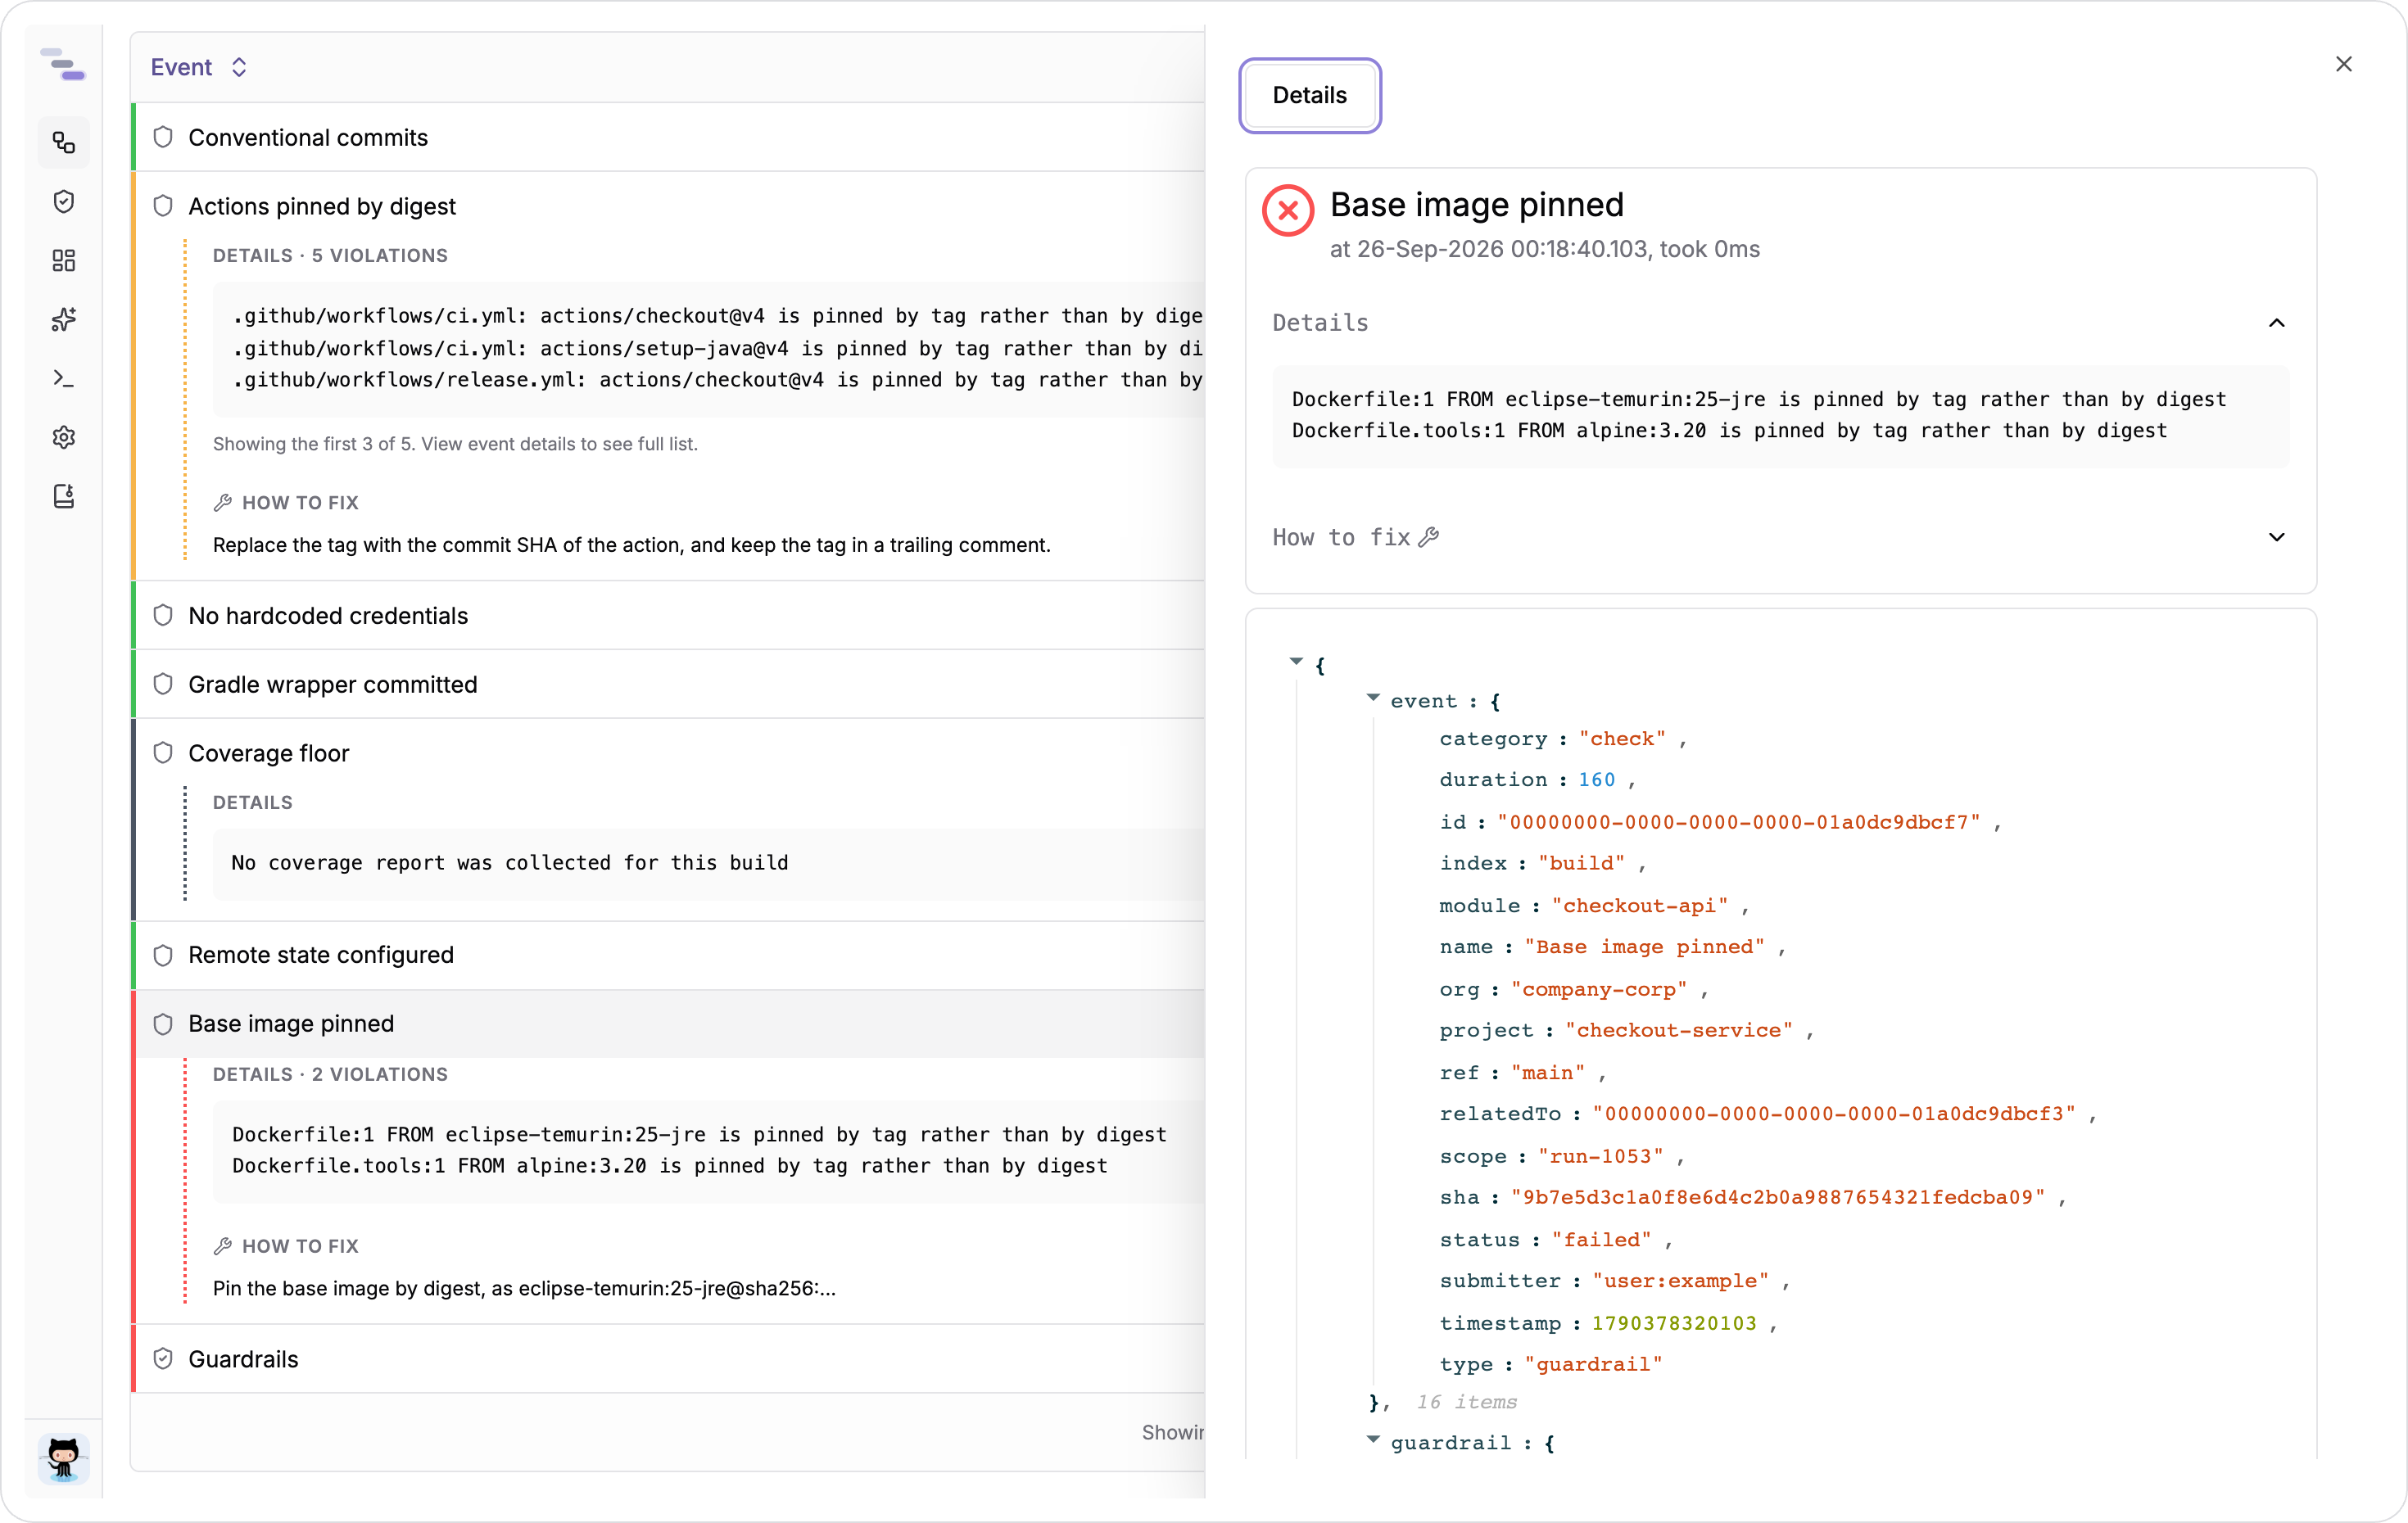
The evidence shown here is limited to the first few violations, and the sheet tells you when there are more. The full list is in the guardrail-violations.txt attachment, with one violation per line, and you can preview it further down the sheet. Whenever you need every violation a guardrail found, use the attachment rather than the evidence lines.
Failed checks also include remediation advice from the guardrail's definition, explaining how to fix the problem.
Inspecting the collected facts
Guardrails don't read your repository directly. Instead, they rely on collectors, which gather information from the repository, the build and its reports once per run. Every guardrail that needs a collector receives the same data.
All of that data is attached to the run event as guardrail-facts.json.
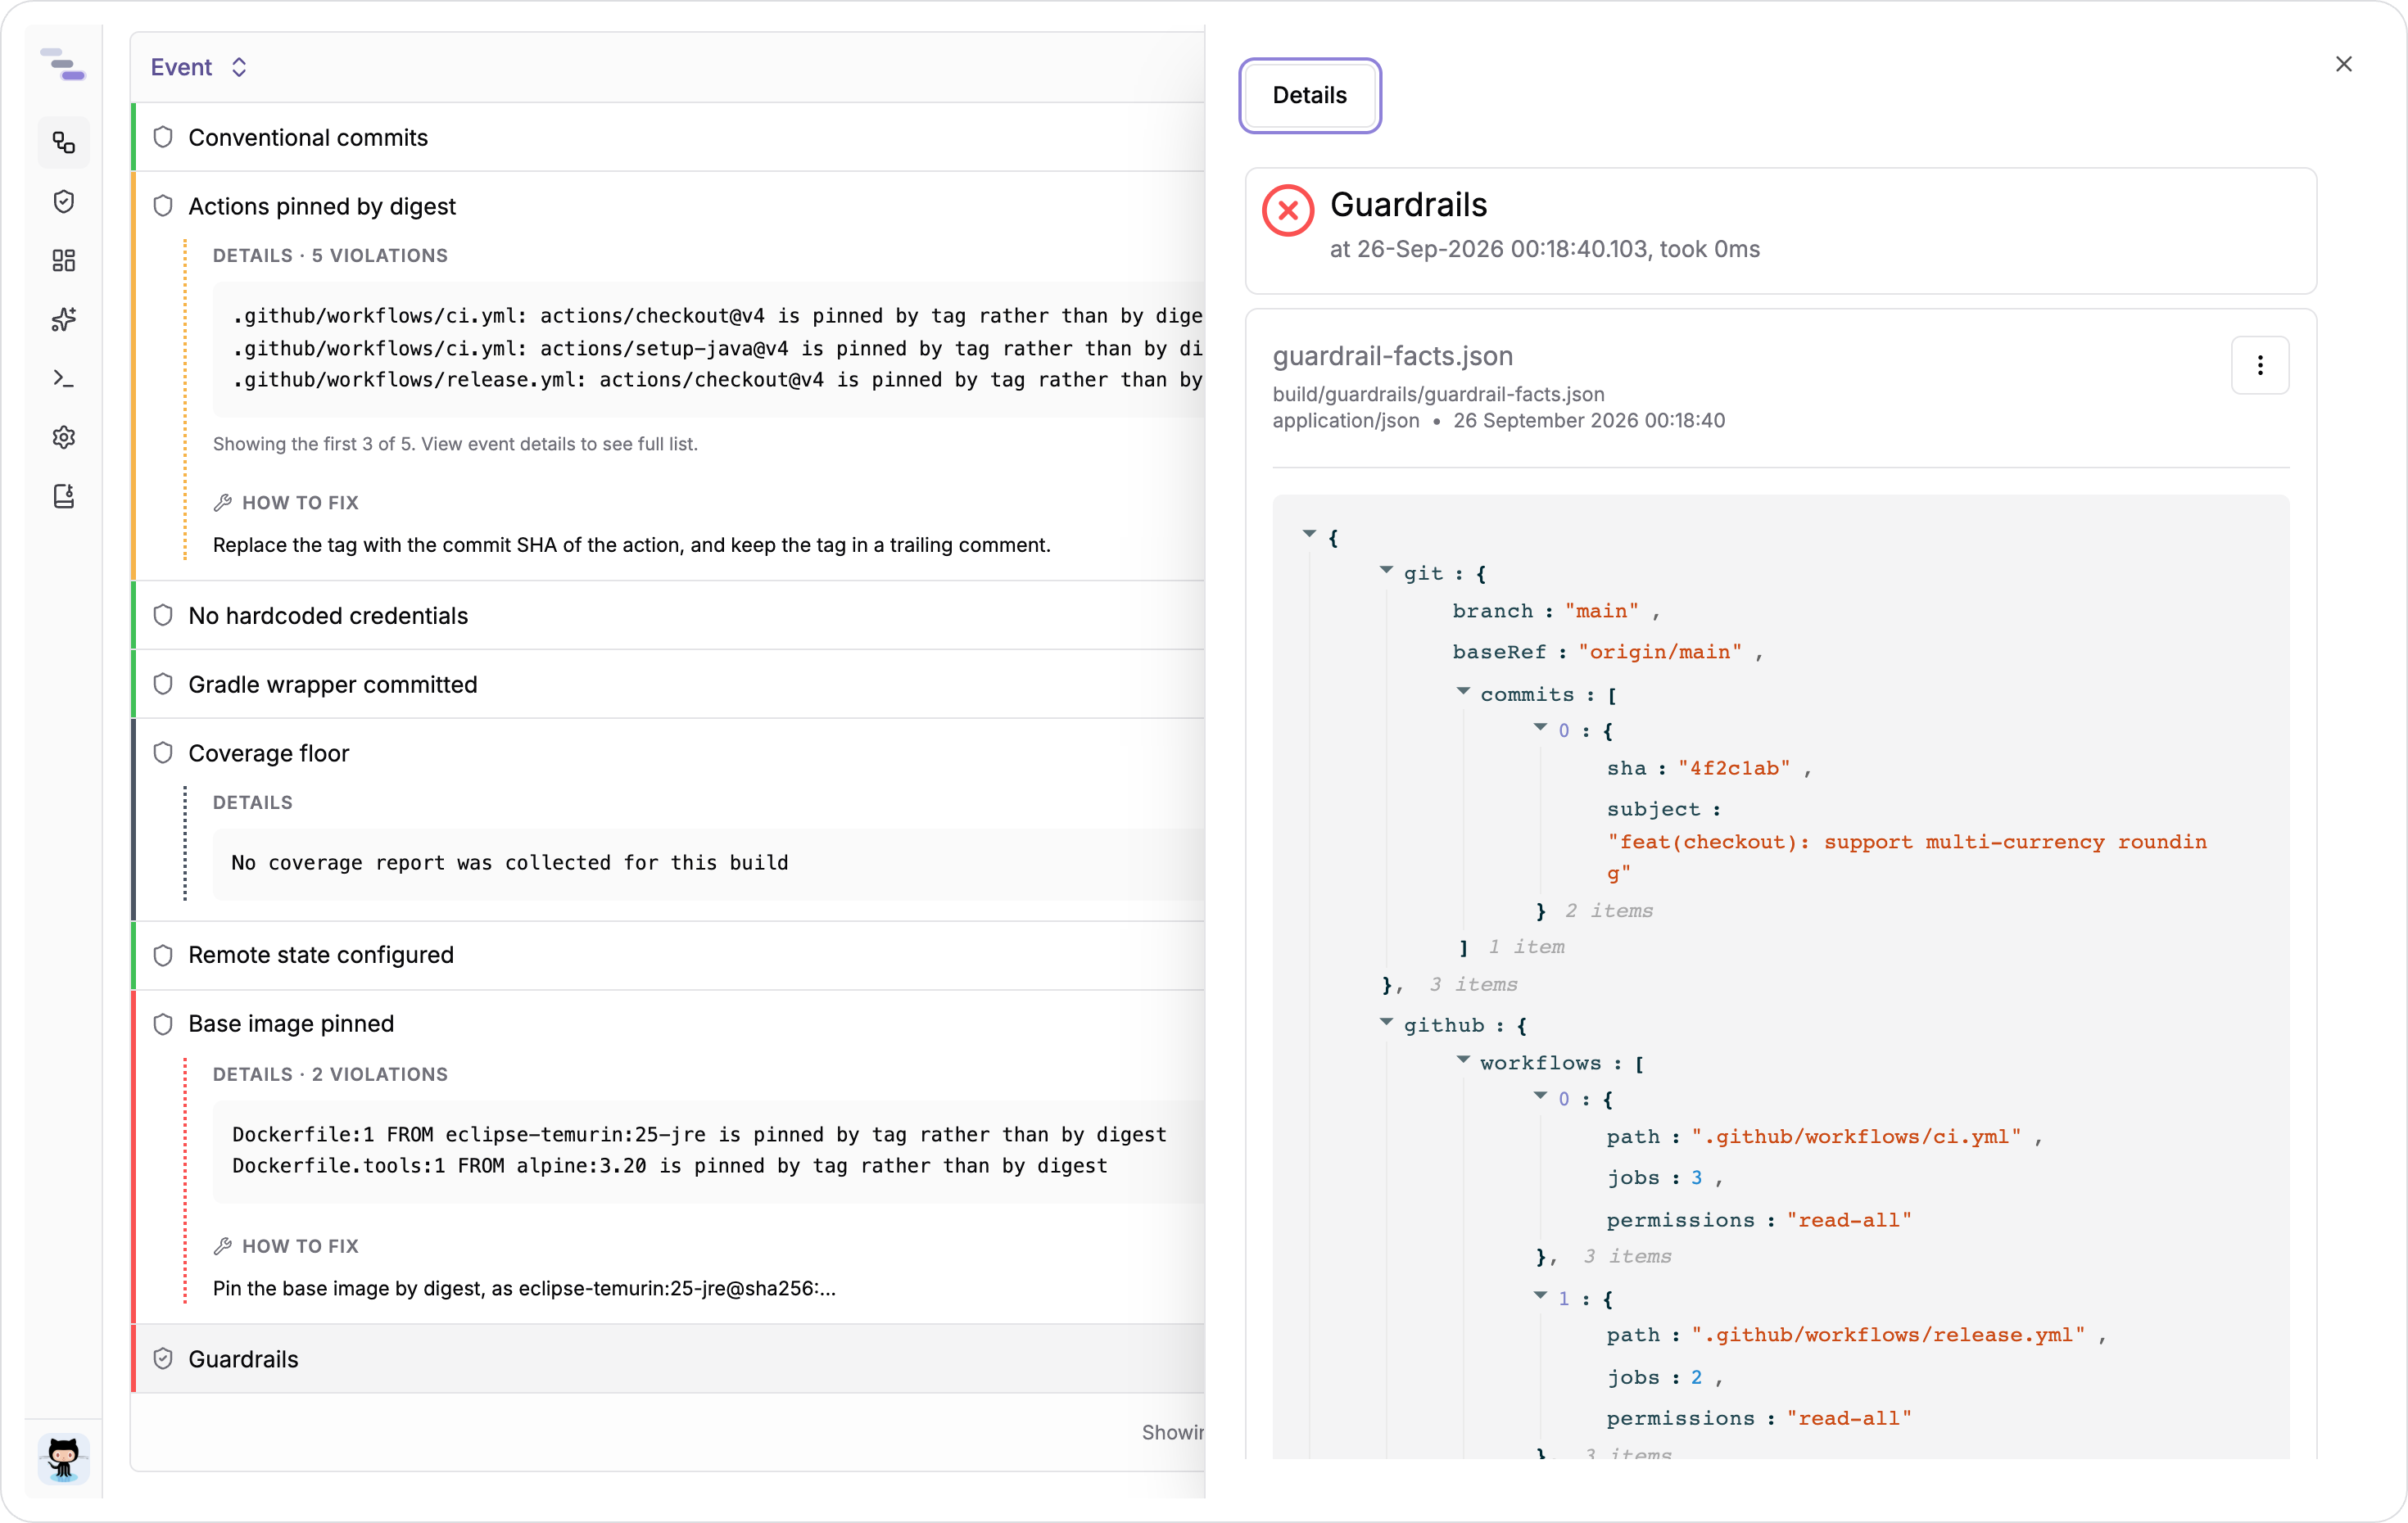
If a result surprises you, open this file. A guardrail can only be as accurate as the data its collectors found, and this file shows exactly what that data was. Collectors that found nothing relevant are left out, so a Gradle-only project has no maven key. A guardrail that depends on a collector with nothing to report skips rather than fails.
Viewing your team's guardrail posture
A build shows you what happened in that build. To see where your whole team stands without opening builds one by one, use the team guardrails view, which combines results across every module.
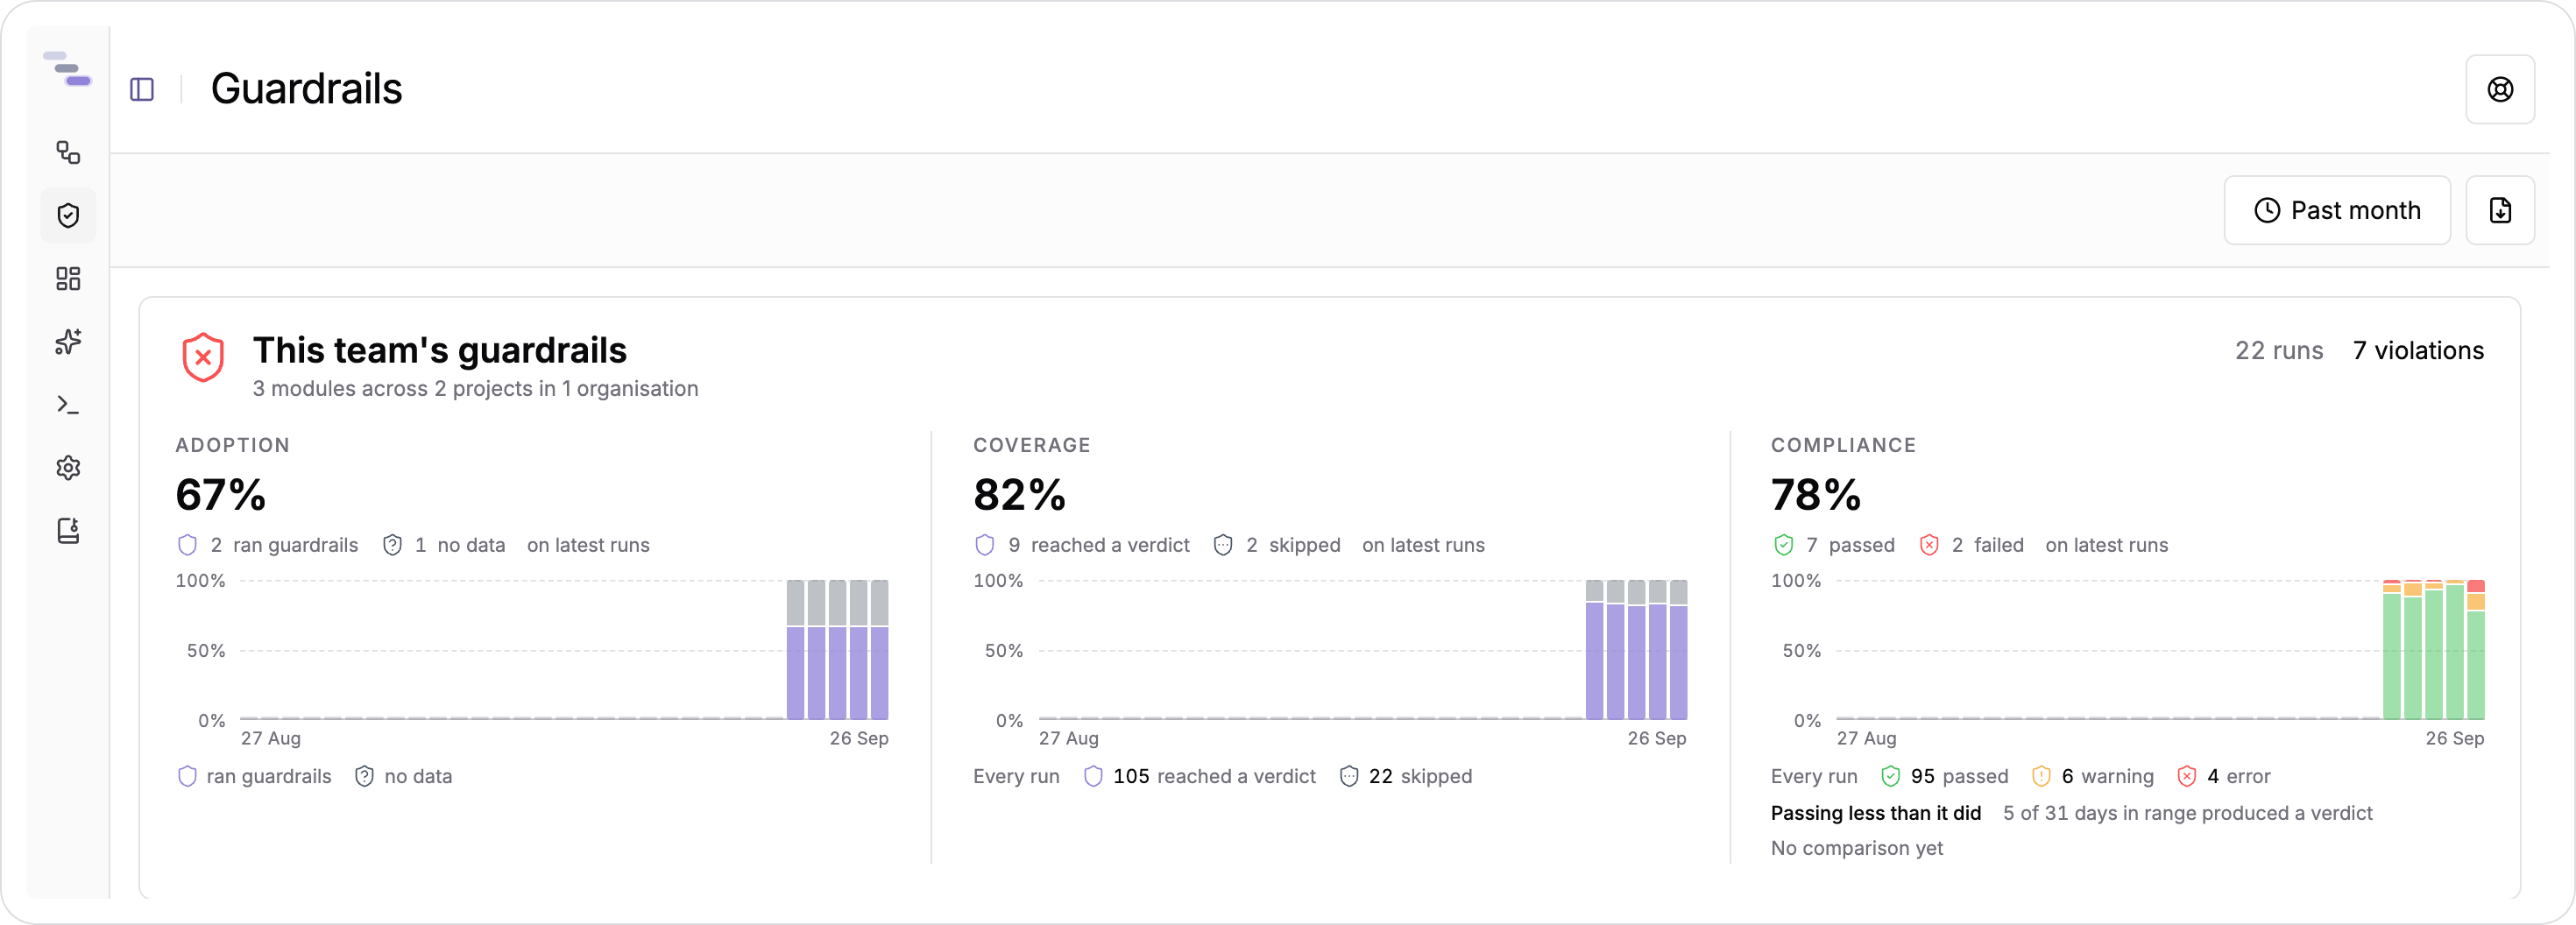
At the top are three metrics that summarise all your guardrails:
- Adoption is the share of your team's modules that ran guardrails at all. A module that builds but never submits a guardrail run isn't being measured.
- Coverage is the share of checks that reached a result instead of skipping. A low number usually means a collector couldn't find anything to read, not that a guardrail is wrong.
- Compliance is the share of those results that passed. Skipped checks never count as passes, so check coverage before you rely on compliance.
These three metrics use each module's most recent run within the selected time window, rather than averaging every run. They show where each module stands right now. For the trend over time, look at the chart under each metric. Each one counts every run in the window, one column per day. Adoption shows the share of modules that ran guardrails that day, coverage shows the share of checks that reached a result, and compliance splits results into checks that passed and checks that failed with an error, warning or info severity. Days with no runs are left blank instead of being shown as a rate. Hover a day to see its counts.
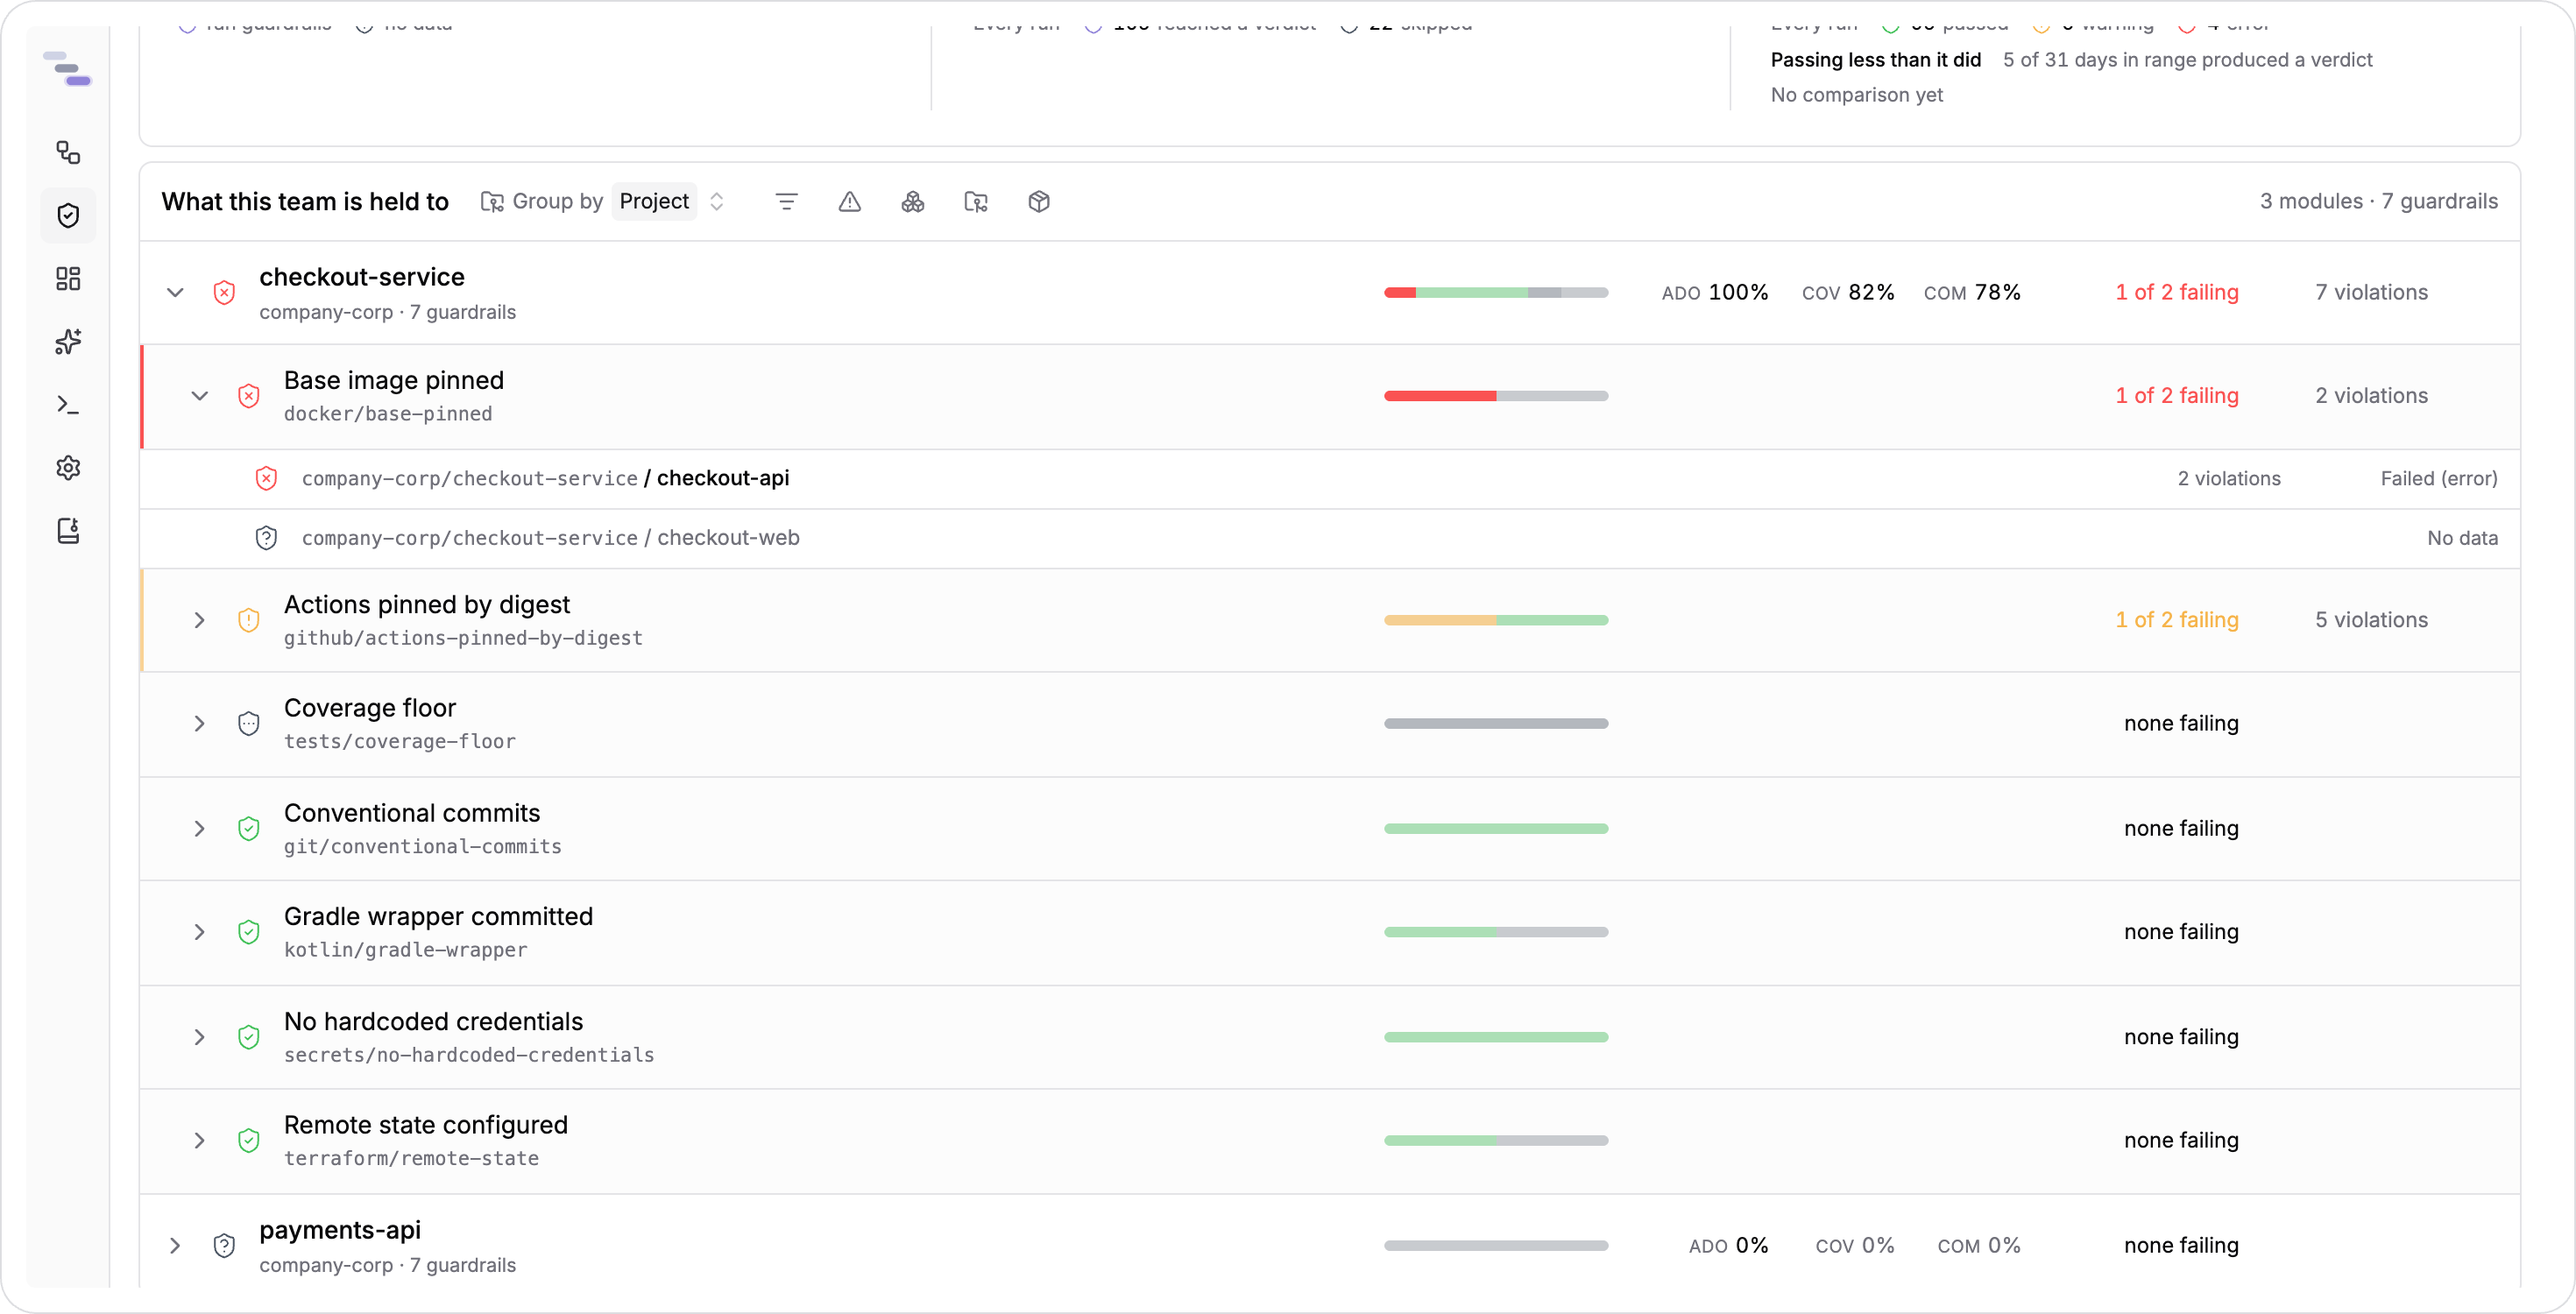
The What this team is held to table shows the same results in more detail. It's grouped by project by default, and you can group by category, module or guardrail instead, or filter by verdict, severity, category, project and module. Expand a group to see its guardrails, then expand a guardrail to see every module that runs it and how each one did.
The Failing in the most modules panel lists up to six guardrails that are failing somewhere in your team, grouped by category, with the number of modules each one fails in. This is a good place to decide what to fix first, since a guardrail failing in twenty modules can often be fixed with one shared change. The panel only shows six guardrails, so if more are failing, check the table as well.
The Running no guardrails at all panel lists modules that didn't submit a guardrail run in the time window. These modules aren't failing, they simply aren't being measured, so none of the pass rates above include them. They are what the adoption metric counts.
You can also narrow this view to a single organisation, project or module and see the same metrics for that scope.
Reporting results
Guardrail results are sent to the same reporters as buildnote report, which you configure in the report block of buildnote.json. Every reporter receives the same table of results, sorted by severity, with evidence and remediation advice for each failed guardrail.
On the pull request
The GitHub reporter is enabled by default. It adds the results table to the job summary and posts it on the pull request as a comment titled Guardrails. When CI runs again, the existing comment is updated instead of a new one being added, so each pull request has a single guardrails comment.
To turn the reporter off entirely, set enabled to false. To keep the job summary but turn off the pull request comment, set commentEnabled to false:
{
  "report": {
    "github": {
      "enabled": true,
      "commentEnabled": false
    }
  }
}As an HTML file
The HTML reporter creates a standalone file you can upload as a build artifact:
{
  "report": {
    "html": {
      "enabled": true,
      "outputFile": "build/reports/report.html"
    }
  }
}Guardrails won't overwrite your test report. If you set an outputFile, the guardrails report is written next to it with a -guardrails suffix, so build/reports/report.html produces build/reports/report-guardrails.html. Without an outputFile, the report is written to buildnote-guardrails.html in the working directory.
To keep the report, upload it from your workflow:
      - name: Guardrails
        run: buildnote guardrails

      - name: Upload the guardrail report
        uses: actions/upload-artifact@v4
        if: always()
        with:
          name: guardrails
path: build/reports/report-guardrails.htmlMake sure to include if: always(). When a guardrail fails the step, the upload would otherwise be skipped, which means you'd lose the report on exactly the builds where you need it.
To Slack and Discord
The Slack and Discord reporters send a notification listing each guardrail with a status icon. Both accept a condition, so you're only notified about the runs that matter to you:
{
  "report": {
    "slack": {
      "enabled": true,
      "url": "{{env.SLACK_WEBHOOK_URL}}",
      "condition": "{{failed}}"
    }
  }
}The condition is evaluated against the guardrail run instead of a test run, so you can use failed, violations, total and the build details in it.
As data
You can query guardrail results like any other data in Buildnote. The guardrails table has one row per guardrail per build:
SELECT guardrail, status, violations FROM guardrails WHERE build = '1053' AND category = 'check'Because each guardrail keeps the same identity across builds, the most useful queries look at trends over time. For example, to find which guardrails fail most often:
SELECT guardrail, COUNT(*) AS failures FROM guardrails WHERE status = 'failed' AND category = 'check' GROUP BY guardrail ORDER BY failures DESCYou can run these queries from Query, or add them to a dashboard to track them alongside your other delivery metrics.
Rolling out without breaking builds
A guardrail that starts failing builds the day it's added often gets removed soon after, because it immediately blocks work that was already in progress. To avoid that, start in reporting mode so your team can see what it finds before it can block anyone:
{
  "guardrails": {
    "failOn": "never",
    "checks": [
      {
        "use": "docker/base-pinned@v1"
      }
    ]
  }
}With failOn: never, every result is recorded and every comment is posted, but the build never fails. Keep it that way long enough to see the trend and fix what it found, then switch to failOn: error.
You can do the same for individual guardrails. Keep failOn set to error and set a guardrail's severity to warning. The guardrail reports its findings without failing the build, and when you're ready to enforce it, you only need to change that one word.
Policies for individual modules
If your repository contains several services, you probably don't want the same guardrails applied to all of them. A policy lets you define a separate guardrails block in its own file, along with the directories it applies to:
{
  "name": "checkout",
  "moduleId": "checkout",
  "paths": [
    "services/checkout",
    "services/checkout-worker"
  ],
  "guardrails": {
    "failOn": "error",
    "checks": [
      {
        "use": "docker/base-pinned@v1"
      }
    ]
  }
}buildnote guardrails --policy policies/checkout.jsonEach path is treated as a separate working directory, not a filter. Collectors run once for each path, so every check looks at that module rather than the repository root. A run over several paths still produces a single result, which includes the violations from every path, each labelled with the path where it was found.
Each policy submits results under its own moduleId, so if one job runs several policies, their events, pull request comments and reports stay separate. See Policies for the full format.
Writing your own guardrails
The built-in library covers rules that most teams share. For rules specific to your team, such as a naming convention from your service template, a header every module must include, or a dependency that must never come back, you can write your own. A guardrail is a JSON definition plus a script that prints its result as JSON. There's no special rules language to learn, and your script receives the same collector data as the built-in guardrails.
Add the locations of your guardrails to sources, then reference them like any other guardrail:
{
  "guardrails": {
    "sources": [
      "github://company/our-guardrails",
      "./guardrails"
    ],
    "checks": [
      {
        "use": "team/no-todo-in-main@v1"
      }
    ]
  }
}Guardrail references are looked up in the built-in library first, which the CLI downloads from GitHub at the tag the reference names, then in each source in order, so your guardrails sit alongside the built-in ones rather than replacing them. There are two kinds of source:
- A path source is a directory on the machine running the command.
- A
github://source uses the guardrail's version as a git ref, so you pin a guardrail by tagging it. The version is always required, which means a guardrail never accidentally resolves against a branch that keeps moving.
If no source defines a referenced guardrail, that's treated as a configuration error rather than a skip, so a typo in a guardrail name won't go unnoticed. If a source can't be reached at all, its guardrails are recorded as skipped.
Your own guardrails behave just like the built-in ones: they record events, respect failOn, appear in the pull request comment and count towards your team's adoption, coverage and compliance. Because scripts from your own sources run on your runner, buildnote --verbose guardrails prints the location and SHA-256 hash of every script it runs. To pin a specific version of a check's script, add its hash as sha256 on the check entry.
See Writing a guardrail for the definition format, the script contract and the Python helper that most checks are built on.
Next steps
- Browse the guardrail library to see every available guardrail
- Read Configuring guardrails for every configuration option
- See the
buildnote guardrailscommand reference for every flag - Follow Writing a guardrail when the library doesn't have a rule your team needs